WorkSpaces Windows client application
The following information will help you get started with the WorkSpaces Windows client application.
Contents
- Requirements
- Setup and installation
- Determine your client version
- Connect to your WorkSpace
- Manage your login information (3.0+ clients only)
- Client views
- Client language
- Display support
- Proxy servers
- Command shortcuts
- Disconnect
- Clipboard support
- Manage hardware acceleration
- Diagnostic log upload
- Release notes
Requirements
- The 4.x client and higher versions require 64-bit Microsoft Windows 8.1, Windows 10, or Windows 11.
- The 3.x client requires 32-bit Microsoft Windows 7, Windows 8, or Windows 10.
- The client version 5.20.0 and higher versions require Windows 11 - Version 22000 or later or Windows 10 - Version 1607 or later.
Note
WSP WorkSpaces are only supported with Windows client version 5.1.0.329 or higher.
Setup and installation
Download and install the version of the client that you need as follows:
| To install. | Do this |
|---|
| 5.x client | Open Amazon WorkSpaces Client Downloads and find the WorkSpaces Windows client. Under Get the latest 64 bit client, choose the Download button. |
| 4.x client | Open Previous Versions . Find the WorkSpaces Windows client version and choose the Download button. |
| 3.x client | Open Amazon WorkSpaces Client Downloads and find the WorkSpaces Windows client. Under Get the latest 32-bit client, choose the Download button. |
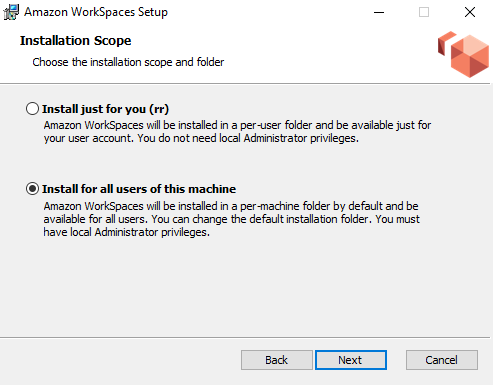
You have two choices for how to install the Amazon WorkSpaces Windows client application:
- Install just for you. If you choose this option and you share your local machine with other users, the WorkSpaces client application is available only to you. If other users on the machine also want to use the WorkSpaces client application, they must install the application for their own use.
- Install for all users of this machine. If you choose this option, the WorkSpaces client application is available to anyone who logs on to the local machine, including those with Guest accounts.
Installing the WorkSpaces client application for all users requires you to have administrator privileges on your local machine. Depending on how your local machine is configured, you might not have such privileges. In that case, you can install the WorkSpaces client application just for yourself. If you have questions about which option to choose, ask your WorkSpaces administrator for guidance.
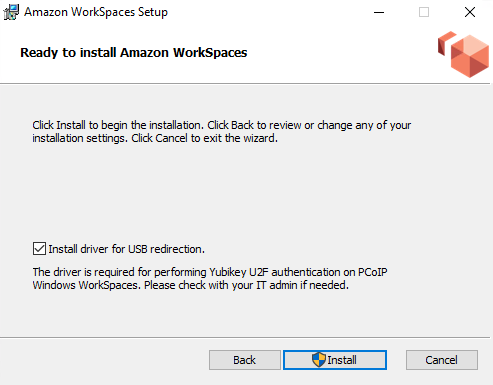
When installing the client 4.0+ version, you will have an option to install the USB redirection driver for features like Yubikey U2F redirection support. Use the following procedure to install the USB redirection driver.
To install the USB redirection driver
- On the Amazon WorkSpaces Setup page, select Install for all users of this machine. Choose Next.
msiexec.exe /i "[path to msi]" /qn INSTALL_USB="1" ALLUSERS="1"
To install the client without PCoIP USB redirection, enter and run the following command in an elevated command prompt.
msiexec.exe /i "[path to msi]" /qn ALLUSERS="1"
If you're having trouble updating your WorkSpaces Windows client application to a newer version, use the following procedure to update your client application.
To update the WorkSpaces Windows client application to a newer version
- On your local machine, open the Windows search box and enter registry editor to open the Registry Editor (regedit.exe).
- When asked "Do you want to allow this app to make changes to your device?", choose Yes.
- In the Registry Editor, navigate to the following registry entry: Computer\HKEY_CURRENT_USER\Software\Amazon Web Services. LLC\Amazon WorkSpaces\WinSparkle
- Delete the SkipThisVersion registry key. When prompted to confirm the deletion, choose Yes, and then close the Registry Editor.
- If you have not already entered a registration code in the WorkSpaces Windows client application, do so, and then choose Amazon WorkSpaces, Quit Amazon WorkSpaces to close the client application.
- Restart the WorkSpaces Windows client application. You should be prompted to update the client. Accept the update.
Determine your client version
To see which version of the WorkSpaces client you have, choose Amazon WorkSpaces, About Amazon WorkSpaces, or click the gear icon in the upper-right corner and choose About Amazon WorkSpaces.
Connect to your WorkSpace
To connect to your WorkSpace, complete the following procedure.
- The first time that you run the client application, you are prompted for your registration code, which is contained in your welcome email. The WorkSpaces client application uses the registration code and user name to identify which WorkSpace to connect to. When you launch the client application later, the same registration code is used. To enter a different registration code, launch the client application, and then choose Change Registration Code at the bottom of the login page.
- Enter your sign-in credentials in the login screen and choose Sign In. If your WorkSpaces administrator has enabled multi-factor authentication for your organization's WorkSpaces, you are prompted for a passcode to complete your login. Your WorkSpaces administrator will provide more information about how to obtain your passcode.
- If your WorkSpaces administrator has not disabled the Keep me logged in feature, you can select the Keep me logged in check box at the bottom of the login screen to save your credentials securely so that you can connect to your WorkSpace easily while the client application remains running. Your credentials are securely cached up to the maximum lifetime of your Kerberos ticket. After the client application connects to your WorkSpace, your WorkSpace desktop is displayed.
An interruption of network connectivity causes an active session to be disconnected. This can be caused by events such as closing the laptop lid, or the loss of your wireless network connection. The WorkSpaces client application for Windows attempts to reconnect the session automatically if network connectivity is regained within a certain amount of time. The default session resume timeout is 20 minutes, but this timeout can be modified by your network administrator.
Manage your login information (3.0+ clients only)
You can view your registration code and what Region your WorkSpace is in. You can specify whether you want the WorkSpaces client application to save your current registration code, and you can assign a name to your WorkSpace. You can also specify if you want Amazon WorkSpaces to keep you logged in to a WorkSpace until you quit or your login period expires.
To manage your login information for a WorkSpace
- In the WorkSpaces client application, go to Settings, Manage Login Information.
- In the Manage Login Information dialog box, you can see the registration code and Region information for your WorkSpace.
- (Optional) If you want the WorkSpaces client to remember your current registration code, select the Remember Registration Code check box.
- Under Saved registration codes, select the WorkSpace that you want to name.
- In the WorkSpace name box, enter a name for the WorkSpace.
- (Optional) If you want WorkSpaces to keep you logged in until you quit or your login period expires, select the Keep me logged in check box.
- Choose Save.
Client views
You can switch to full screen mode by choosing View, Enter Full Screen (3.0+ clients) in the client application menu.
While in full screen mode, you can switch back to window mode by moving the pointer to the top of the screen. The client application menu is displayed, and you can choose View, Leave Full Screen (3.0+ clients) in the client application menu.
You can also toggle full screen mode by pressing Ctrl+Alt+Enter.
Client language
You can select the language displayed by the client by performing the following steps.
Note
The WorkSpaces client applications support Japanese. However, Japanese WorkSpaces are available only in the Asia Pacific (Tokyo) Region.
To select the client language
- Depending on which client you're using, do one of the following.
| If you're using. | Do this |
|---|
| 3.0+ client | In the WorkSpaces client application, go to Settings, Change Language. |
Display support
WorkSpaces Value, Standard, Performance, Power, PowerPro, Graphics.g4dn, GraphicsPro.g4dn, and GraphicsPro bundles support a maximum of four displays and a maximum resolution of 3840x2160 (ultra-high definition, or UHD). The maximum supported resolution depends on the number of displays, as shown in the following table.
Note
- You can only extend the display. You cannot duplicate the display. Duplicating the display will cause your session to be disconnected.
- Graphics bundles support only a single monitor configuration with a maximum resolution of 2560x1600.
The WorkSpaces client application extracts the Extended Display Information Data (EDID) of all attached displays and determines the best compatibility match before starting the session. If you have a high pixel density (high DPI) display, the client application automatically scales the streaming window according to your local DPI settings. For better maximum resolution with high DPI displays, see Enabling high DPI display for WorkSpaces.
To use multiple monitors with WorkSpaces
- Configure your local machine to use multiple monitors. For more information, see How to use multiple monitors in Windows 10 in the Microsoft documentation.
- Start the WorkSpaces client application and log in to your WorkSpace.
- Depending on which client you're using, do one of the following:
| If you're using. | Do this |
|---|
| 3.0+ client | Choose View, Enter Full Screen On All Displays. You can also toggle full screen mode by pressing Ctrl+Alt+Enter. |
Your WorkSpace should now be extended across your displays. Whichever display you have designated as your primary display is also the primary display in WorkSpaces when you enter full screen mode.
Note
Using full screen mode on only some of the displays in a multiple monitor setup isn't possible. You can, however, press the Windows logo key + Up Arrow or use the maximize button in the upper-right corner of the WorkSpaces window to maximize the WorkSpaces client window on a display without extending the WorkSpace to the other displays.
Proxy servers
If your network requires you to use a proxy server to access the internet, you can enable your WorkSpaces client application to use a proxy for HTTPS (port 443) traffic. The WorkSpaces client applications use the HTTPS port for updates, registration, and authentication.
Note
- The desktop streaming connections to the WorkSpace require ports 4172 and 4195 to be enabled, and do not go through the proxy server.
- Proxy servers that require authentication with sign-in credentials are not supported.
By default, the 3.0+ Windows clients use the proxy server that's specified in the device operating system settings. The first time the client is launched, the device operating system proxy server setting is used. If you select another option for the proxy server, that setting is used for subsequent launches of the client. If a proxy server is specified at both the operating system level and in the WorkSpaces client, the client setting is used.
Starting with version 3.0.12 of the Windows client, you can also choose not to use a proxy server.
Note
In versions 3.0.0 through 3.0.11, if you specify a custom proxy server, a "No network" error might appear when you attempt to log in to your WorkSpace. If you want to use a custom proxy server with the Windows client, we recommend upgrading to the latest version.
- In the WorkSpaces client application, go to Settings, Manage Proxy Server.
- In the Set Proxy dialog box, select the appropriate options, depending on which version of the 3.0+ client you have.
- Windows client version 3.1.3 or later — To disable usage of a proxy server, select Don't use proxy server. If you select Don't use proxy server, no proxy server is used when you access the internet. To use a proxy server, choose one of the following options, and then choose Save:
- Use your device operating system settings — This option uses the proxy server settings for your operating system.
- Customize proxy server for WorkSpaces — Enter the URL or IP address and the port for your custom proxy server.
- Use your device operating system settings — This option uses the proxy server settings for your operating system.
- Customize proxy server for WorkSpaces — Enter the URL or IP address and the port for your custom proxy server.
Command shortcuts
The WorkSpaces Windows client supports the following command shortcuts:
- Ctrl+Alt+Enter—Toggle full screen display
- Ctrl+Alt+F12—Disconnect session
Disconnect
To disconnect the Windows client application, you have several options:
- In the Amazon WorkSpaces client application, go to Amazon WorkSpaces, and then choose Disconnect WorkSpace. Your WorkSpace session ends, but the client application continues running in case you want to log in again.
- In the Amazon WorkSpaces client application, go to Amazon WorkSpaces, and then choose Quit Amazon WorkSpaces. Your WorkSpace session ends, and the client application closes.
- In the Amazon WorkSpaces client application, close the WorkSpaces client window by clicking the close (X) button in the upper-right corner. In the End Session dialog box, choose Yes. Your WorkSpace session ends, but the client application continues running in case you want to log in again.
- You can also log off of the WorkSpace. In the Amazon WorkSpaces client application, go to View, and then choose Send Ctrl+Alt+Delete. Choose Sign Out. Your WorkSpace session ends, but the client application continues running in case you want to log in again.
Clipboard support
The clipboard supports a maximum uncompressed object size of 20 MB. For more information, see I'm having trouble copying and pasting.
Note
When copying from a Microsoft Office app, the clipboard only contains the last copied item, and the item is converted into standard format. If you copy content larger than 890 KB from a Microsoft Office app, the app might become slow or unresponsive for up to 5 seconds.
Manage hardware acceleration
Starting with version 5.0.0, hardware acceleration is enabled by default when you're using the Amazon WorkSpaces Windows client application.
Note
If you plan to upgrade to a version between 3.1.4 and 5.0.0, and if you've disabled hardware acceleration for version 3.1.3 or earlier by using the procedure described later in this section, make sure that you re-enable hardware acceleration in Windows by setting the DisableHWAcceleration registry key to 0 . Then you can upgrade to a version between 3.1.4 and 5.0.0 of the WorkSpaces Windows client application.
If you're experiencing high CPU usage or slower performance when using the client, you might want to enable hardware acceleration in the client.
Note
If you enable hardware acceleration in the Windows client, the following issues might occur with a few video driver versions:
- The screen might have flickering black boxes in some places.
- The screen might not properly update on the WorkSpaces login page, or it might not properly update after you log in to your WorkSpace. You might see artifacts on the screen.
- Your mouse clicks might not be lined up with the cursor position on the screen.
- Choose Settings, Manage Hardware Acceleration.
- In the Manage Hardware Acceleration dialog box, select Enable Hardware Acceleration for Amazon WorkSpaces, and then choose Save.
- For this change to take effect, choose Amazon WorkSpaces, Quit Amazon WorkSpaces to close the Windows client application.
- Restart the WorkSpaces Windows client application. Hardware acceleration should now be enabled. After you've enabled hardware acceleration in the Windows client, if the screen and mouse issues described earlier occur, clear the Enable Hardware Acceleration for Amazon WorkSpaces check box to disable hardware acceleration, and then restart the Windows client application.
WorkSpaces administrators can enable hardware acceleration in version 3.1.4 or later of the WorkSpaces Windows client by using the following commands in a Command Prompt or PowerShell window.
- Use the following command to check for the EnableHwAcc registry key.
reg query "HKCU\SOFTWARE\Amazon Web Services. LLC\Amazon WorkSpaces" /v EnableHwAcc
reg add "HKCU\SOFTWARE\Amazon Web Services. LLC\Amazon WorkSpaces" /v EnableHwAcc
If needed, use the following command to delete the EnableHwAcc registry key.
reg delete "HKCU\SOFTWARE\Amazon Web Services. LLC\Amazon WorkSpaces" /v EnableHwAcc /f
This registry setting takes effect after the WorkSpaces Windows client is closed and restarted.
- Choose Settings, Manage Hardware Acceleration.
- In the Manage Hardware Acceleration dialog box, unselect Enable Hardware Acceleration for Amazon WorkSpaces, and then choose Save.
- For this change to take effect, choose Amazon WorkSpaces, Quit Amazon WorkSpaces to close the Windows client application.
- Restart the WorkSpaces Windows client application. Hardware acceleration should now be disabled.
- On your Windows computer (not your WorkSpace), open the Windows search box, and enter registry editor to open the Registry Editor (regedit.exe). Choose Run as administrator. (If you don't have permission to run the Registry Editor as an administrator, contact your system administrator for assistance.)
- When asked "Do you want to allow this app to make changes to your device?", choose Yes.
- In the Registry Editor, navigate to the following registry entry: HKEY_CURRENT_USER\SOFTWARE\Amazon Web Services. LLC\Amazon WorkSpaces
- Select Amazon WorkSpaces, and then choose Edit >New >String Value.
- For the registry key name, enter EnableHwAcc .
- Close the Registry Editor.
- Close and restart the WorkSpaces client application. After you've enabled hardware acceleration in the Windows client, if the screen and mouse issues described earlier occur, delete the EnableHwAcc registry key to disable hardware acceleration, and then restart the Windows client application.
WorkSpaces administrators can enable hardware acceleration in version 3.1.4 or later of the WorkSpaces Windows client by using the following commands in a Command Prompt or PowerShell window.
- Use the following command to check for the EnableHwAcc registry key.
reg query "HKCU\SOFTWARE\Amazon Web Services. LLC\Amazon WorkSpaces" /v EnableHwAcc
reg add "HKCU\SOFTWARE\Amazon Web Services. LLC\Amazon WorkSpaces" /v EnableHwAcc
If needed, use the following command to delete the EnableHwAcc registry key.
reg delete "HKCU\SOFTWARE\Amazon Web Services. LLC\Amazon WorkSpaces" /v EnableHwAcc /f
This registry setting takes effect after the WorkSpaces Windows client is closed and restarted.
If you need to use version 3.1.3 or earlier of the Windows client application, you can disable hardware acceleration in Windows through the Windows registry. Disabling hardware acceleration in Windows might affect the performance of other Windows applications.
- On your Windows computer (not your WorkSpace), open the Windows search box, and enter registry editor to open the Registry Editor (regedit.exe). Choose Run as administrator. (If you don't have permission to run the Registry Editor as an administrator, contact your system administrator for assistance.)
- When asked "Do you want to allow this app to make changes to your device?", choose Yes.
- In the Registry Editor, navigate to the following registry entry: HKEY_CURRENT_USER\SOFTWARE\Microsoft\Avalon.Graphics
- Do one of the following:
- If the DisableHWAcceleration registry key exists, select it and choose Edit >Modify. In the Value data box, enter 1 (to disable hardware acceleration), and then choose OK.
- If the DisableHWAcceleration registry key doesn't exist, do the following:
- Select Avalon.Graphics, and then choose Edit >New >DWORD (32-bit) Value.
- For the registry key name, enter DisableHWAcceleration .
- Select the new DisableHWAcceleration key, and then choose Edit >Modify.
- In the Value data box, enter 1 (to disable hardware acceleration), set Base to Hexadecimal, and then choose OK.
Note
If you need to enable hardware acceleration to improve the performance of other Windows applications, set the DisableHWAcceleration key to 0 .
Diagnostic log upload
Enabling diagnostic log uploads
To troubleshoot issues with the WorkSpaces client, you can enable diagnostic logging. The log files that are sent to WorkSpaces include detailed information about your device and connection to the AWS network. You can enable diagnostic log uploads before or during WorkSpace streaming sessions so that these files are sent to WorkSpaces automatically.
To send log files
Note
You can send log files before and during WorkSpaces streaming sessions.
- Open your Amazon WorkSpaces client.
- At the top of the WorkSpaces sign-in page, choose Manage Diagnostic Logging Settings.
- In the pop-up dialog box, choose Enable Diagnostic Logging for Amazon WorkSpaces and click Save.
Important
When you report an issue to AWS support, ensure you keep track of the device ID of the client who is experiencing the issue. This device ID can be found in the diagnostics logging menu, in the WorkSpaces client navigation bar, and it helps the support team identify logs associated with your specific device. Ensure you include the device ID in the tickets that you create regarding this specific issue.
Release notes
The following table describes the changes to each release of the Windows client application. As a general security best practice, we recommend that WorkSpaces customers update client software as relevant patches become available to obtain the latest updates. For additional information on all the supported WorkSpaces client versions, see WorkSpaces client application end of life policy.
Bug fixes and enhancements.
- Added support to persist webcam and microphone settings for future sessions on WSP WorkSpaces.
- Updated the WSP SDK.
Bug fixes and enhancements.
- Updated PCoIP SDK.
- Updated WSP SDK.
- Migrated the software framework to .NET 8 LTS.
- Updated system to require Windows 11 - Version 22000 or later and Windows 10 - Version 1607 or later.
- Updated WSP SDK.
- Fixed issue where white screens appear in all displays when using multiple monitors with WorkSpaces and clicking full screen.
- Fixed issue where users get immediately disconnected from their WSP WorkSpaces when connecting to it.
- Fixed issue where the device dialog box isn't showing correct localized language when switching languages.
- Updated WSP SDK.
- Added WebAuthn support for in-session authentication.
Updated WSP SDK.
- Fixed USB redirection issue for PCoIP WorkSpaces.
- Fixed a client crash when users change running mode.
- Fixed a client crash related to printer redirection on WSP client.
- Bug fixes and enhancements.
- Added installation guidance. Users on 4.0.6+ version clients with USB redirection enabled need to uninstall old client before upgrading
- Added restrictions that only admins have permission to modify custom installation folder
- Updated WSP SDK
- Added resiliency for network issues for WSP WorkSpaces
- Updated WSP SDK
- Bug fixes and enhancements
- Updated PCoIP SDK and WSP SDK
- Resolved an login page special character processing issue
- Resolved a crashing issue when closing the Network dialog on the upper right of the client application
- Added a link to Amazon WorkSpaces user guide under the Support menu
Bug fixes and enhancements
Bug fixes and enhancements
- Bug fixes and enhancements
- Added Ctrl+Alt+Shift+F11 as a keyboard shortcut to access the client menu during a streaming session
- Fixed the issue where the text was getting cut off on the client login page when the operating system text size was set to 200%
- Fixed a bug where the keyboard focus in the dialog box did not cycle through all the device selections when multiple devices were available for redirection.
- Incrementally enhanced accessibility to color contrast and names for elements.
- Improved client custom branding by storing assets in the same AWS Regions as provisioned WorkSpaces
- Resolved black screen issue when using multiple monitors with Ubuntu WorkSpaces
- Fixed client diagnostic log uploading issues, where proxy settings were not being persisted when connecting to WorkSpaces through a proxy server
- Added support for NICE DCV extension SDK, which allows end users to customize their WSP WorkSpaces experience
- Resolved the issue of displaying the Keep me logged in option in the Manage Login Information dialog when logging into WorkSpaces with SAML credentials
- Resolved the issue of users not being able to log into WorkSpaces when proxy server is enabled
- Resolved a keyboard focusing issue when navigating menu items using the Tab key
- Updated WSP SDK to fix connectivity issues when using QUIC on WSP WorkSpaces
- Fixed a bug that prevented users from logging in under certain scenarios
- Fixed a bug to bring certificate selection dialog to the front during smart card logon
- Updated WSPv2 SDK to fix minor bugs
- Enabled trimming leading or trailing allow list in sign-in credentials
- Resolved a crashing issue due to empty registration code
- Provided sufficient color contrast, text labels, and instructions in user interface components, such as a login page and a menu bar.
- Fixed sign-in credential validation issue
- Fixed caps lock flicker issue
- Added support for certificate-based authentication via SAML 2.0 integration, which removes the logon prompt for the Active Directory domain password
- Resolved an issue of the Alt key getting continuously pressed in WorkSpaces
- Resolved an issue of the Num Lock state that was inverted between WorkSpaces and local machine
- Updated PCoIP SDK for the WorkSpaces Windows client
- Bug fixes and enhancements
- Added a shortcut Ctrl+Alt+F12 to disconnect your WorkSpace
- Resolved a keystroke-invoking issue when using Alt key with mouse clicks
Added support for automatic diagnostic log uploads feature that allows you to upload WorkSpaces client log files directly to WorkSpaces to troubleshoot issues without interrupting use of the WorkSpaces client.
- Updated WSP SDK for Windows
- Resolved an issue of the WorkSpaces clients not being able to save their user names after closing their WorkSpace
Fixed the WorkSpaces login page rendering issues on Windows 8.1
Updated PCoIP SDK for the WorkSpaces Windows client
Updated WSP SDK for Windows
- Updated PCoIP SDK for the WorkSpaces Windows client
- Resolved issues when screen sharing WorkSpaces in Microsoft Teams
- Bug fixes and enhancements
- Enhances PCoIP USB redirection driver. The driver includes important updates and we recommend that all users install it
- Resolves failures when using smart cards for authentication for WSP
- Resolves crashes and black screen issues related to video streaming for WSP
- Updates to WSP version 1.9.8.18175
- Optimizes the bandwidth and frame rates for WSP WorkSpaces
- Resolves the shortcut mapping issue related to full screen mode
- Resolves the issue of the Alt key being pressed automatically
- Resolves the issue of users not being able to switch between Korean and English languages using the Alt key on a physical keyboard
- Resolves the mouse scrolling issue that is related to the mouse settings in Windows 10
- Video streaming improvements for WorkSpaces that support WSP
- Bug fixes
- Resolves crashes due to double-byte user names (for example, Japanese characters) on local machines
- Resolves mouse-scrolling issues on 64-bit Windows 8.1
- Bug fixes and enhancements
- Minor bug fixes and enhancements
Important
Client version 4.0 supports Windows 8.1 and Windows 10. Attempting to install version 4.0 on Windows 7 or 8 will result in errors. If you are on Windows 7 or Windows 8, update your OS or download the latest 32 bit client (v3.x) from the Amazon WorkSpaces Client Download page.
- Adds USB redirection support for YubiKey U2F authentication on PCoIP Windows WorkSpaces
- Minor bug fixes and enhancements
- This release includes fixes to custom login workflows with a URI and is recommended for all users
- Bug fixes and enhancements
- Fixes the reconnect page redirection after disconnection when Keep me logged in is selected
- Minor bug fixes and enhancements
- Improves connectivity with WorkSpaces using the WorkSpaces Streaming Protocol (WSP)
- Resolves a crash issue related to proxy servers
- Minor bug fixes and enhancements
Fixes for disconnects and crashes resulting from WorkSpaces Streaming Protocol (WSP) audio traffic optimization
- Adds Settings UI to enable/disable hardware acceleration
- Bidirectional video web cam support is now generally available for Windows WorkSpaces using the WorkSpaces Streaming Protocol (WSP)
- Minor bug fixes and enhancements
- Disables hardware acceleration by default to address screen flickering and mouse mispositioning issues observed with certain display driver versions. To manually turn on hardware acceleration, users can restart the WorkSpaces app after creating a registry string value of EnableHwAcc under HKEY_CURRENT_USER\SOFTWARE\Amazon Web Services. LLC\Amazon WorkSpaces.
- Addresses a few crash scenarios when users register, log in, and rebuild
- Adds localization support for more UI elements
- Minor bug fixes and enhancements
- Fixes issue with double Shift key presses not working in some apps
- Improves settings UI for proxy configurations
- Minor bug fixes and enhancements
- The WorkSpaces Streaming Protocol (WSP) is now generally available. Video-in functionality continues to be available as a beta feature on WSP WorkSpaces only
- Fixes an intermittent issue that impacts client application upgrades
- Fixes an issue with the login screen being magnified
- Minor bug fixes and enhancements
- Adds support for smart card authentication in the AWS GovCloud (US-West) Region
- Minor bug fixes and enhancements
Note
Version 3.1.1 is available only in the AWS GovCloud (US-West) Region
- Resolves intermittent flickering issue inside of an active WorkSpaces session
- Minor bug fixes and enhancements
- Adds support for optionally disabling the use of the default proxy server
- Adds enhancements to the session reconnect experience
- Improves error messaging during session disconnects for WorkSpaces Streaming Protocol (WSP) WorkSpaces
- Fixes keyboard mapping issue with the Shift key for WSP WorkSpaces
- Resolves an issue with enumeration of video-in devices on WorkSpaces Streaming Protocol (WSP) WorkSpaces
- Resolves an intermittent crash issue when disconnecting from a WSP WorkSpace
- Minor bug fixes and enhancements
- Resolves an issue with loading the login screen
- Resolves an issue with persisting a user's screen size preference when the user chooses full screen mode and then exits this mode
- Resolves an issue that causes the menu bar to be hidden after a user exits full screen mode
- Resolves an input method editor (IME) issue
- Adds support for health checks over port 4195 (UDP and TCP)
Minor bug fixes and enhancements
- Adds monochrome cursor support on WorkSpaces Streaming Protocol (WSP) WorkSpaces
- For improved diagnostics, displays round trip time (RTT) as part of the network health check information
- Minor bug fixes and enhancements
June 3, 2020 |
- Adds support for multiple monitors on WorkSpaces Streaming Protocol (WSP) WorkSpaces
- Minor bug fixes and enhancements
April 28, 2020 |
- Adds support for toggling between high DPI and standard DPI displays
- Minor bug fixes and enhancements
March 30, 2020 |
Resolves an issue with the user interface displaying a login prompt if single sign-on (SSO) is enabled for Amazon WorkDocs
March 3, 2020 |
Minor bug fixes and enhancements
February 14, 2020 |
- Adds keyboard shortcut to toggle full screen display
- Adds support for connecting to WorkSpaces Streaming Protocol (WSP) WorkSpaces
- Minor bug fixes and enhancements
November 25, 2019 |
- Improved user interface
- Friendly registration code labels
- Minor bug fixes and enhancements
November 4, 2019 |
Minor bug fixes
- Resolves an intermittent issue related to invalid keystrokes sent when closing a laptop lid
- Minor fixes
- Resolves the issue of displaying a blank app icon image on the Windows 10 task bar after WorkSpace client upgrades
- Minor bug fixes
Resolves an intermittent crashing issue related to computer waking up when opening a laptop lid
- Adds support for German keyboard layouts with Linux WorkSpaces
- Resolves an issue that results in a crash of Excel with clipboard direction
